LDAP Introduction
Any meeting hosted by Cisco Meeting Server takes place in what is known as a Space. Before Cisco acquired Acano, this was referred to as a coSpace and in the API the older coSpace terminology still persists, so any API method mentioning a coSpace is referring to what we today call a Space. Spaces can be created either via the WebAdmin GUI or API.
Another way to create Spaces in CMS is via an LDAP agreement. Information from your LDAP directory (such as Active Directory) is used to create a permanent, personal Space tied to that particular user. These Spaces can be accessed and administered by the end-user using the browser-based WebRTC client or Cisco Meeting App on a desktop or mobile device. Authentication is still relayed back to the LDAP server.
LDAP Configuration
The Web Admin portal has an LDAP configuration section, but it does not expose all the more advanced configuration options and the information is not stored in the clustered database, so the configuration would have to be done manually on each server. If multiple LDAP agreements are required or if you deploy a database cluster, the API should be used to configure LDAP. You will use POST and PUT requests to accomplish this task.
Here is the LDAP server section of the API reference
LDAP methods reside in the API hierarchy under the /ldapMappings, /ldapServers and /ldapSources nodes in the object tree.
- The /ldapServers object defines an LDAP server's address/port information, along with username and password for accessing the server.
- The /ldapMappings object maps LDAP directory objects to corresponding elements in CMS. For instance, the DisplayName Active Directory LDAP field could be mapped to the nameMapping CMS parameter.
- The /ldapSources method ties everything together by associating an /ldapMappings object with an /ldapServers object while specifying an LDAP search base and possibly an LDAP filter.
Add an LDAP Server
Let's look at the API reference for the various LDAP configuration objects. To set up LDAP synchronization, you first need to create an LDAP server object. Here is the LDAP server section of the API reference:
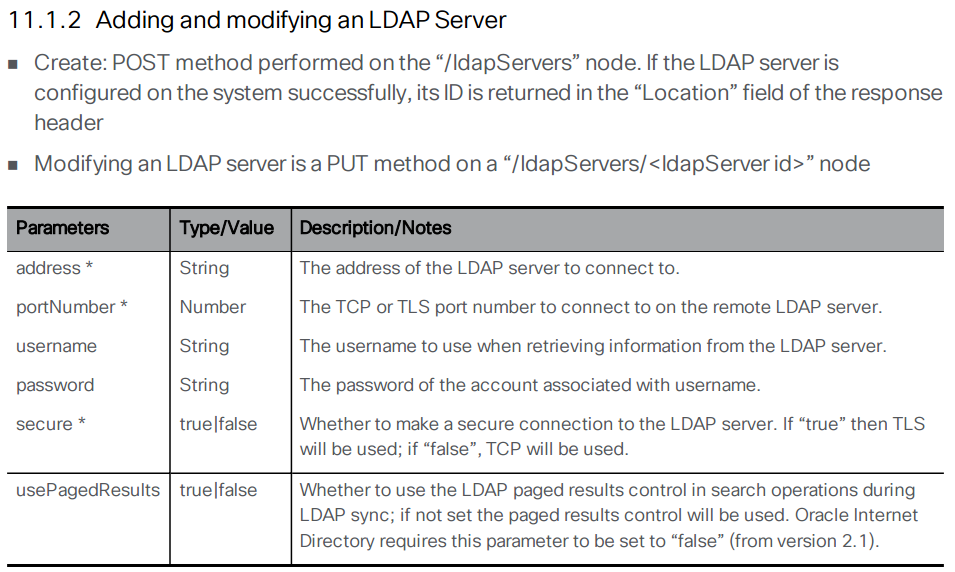
Using the above documentation, you can determine that the URL to access this API endpoint is https://cms1a.pod4.cms.lab:8443/api/v1/ldapServers. Because you are using the API, you only need to perform this configuration once on any node in the cluster and it will be replicated automatically.
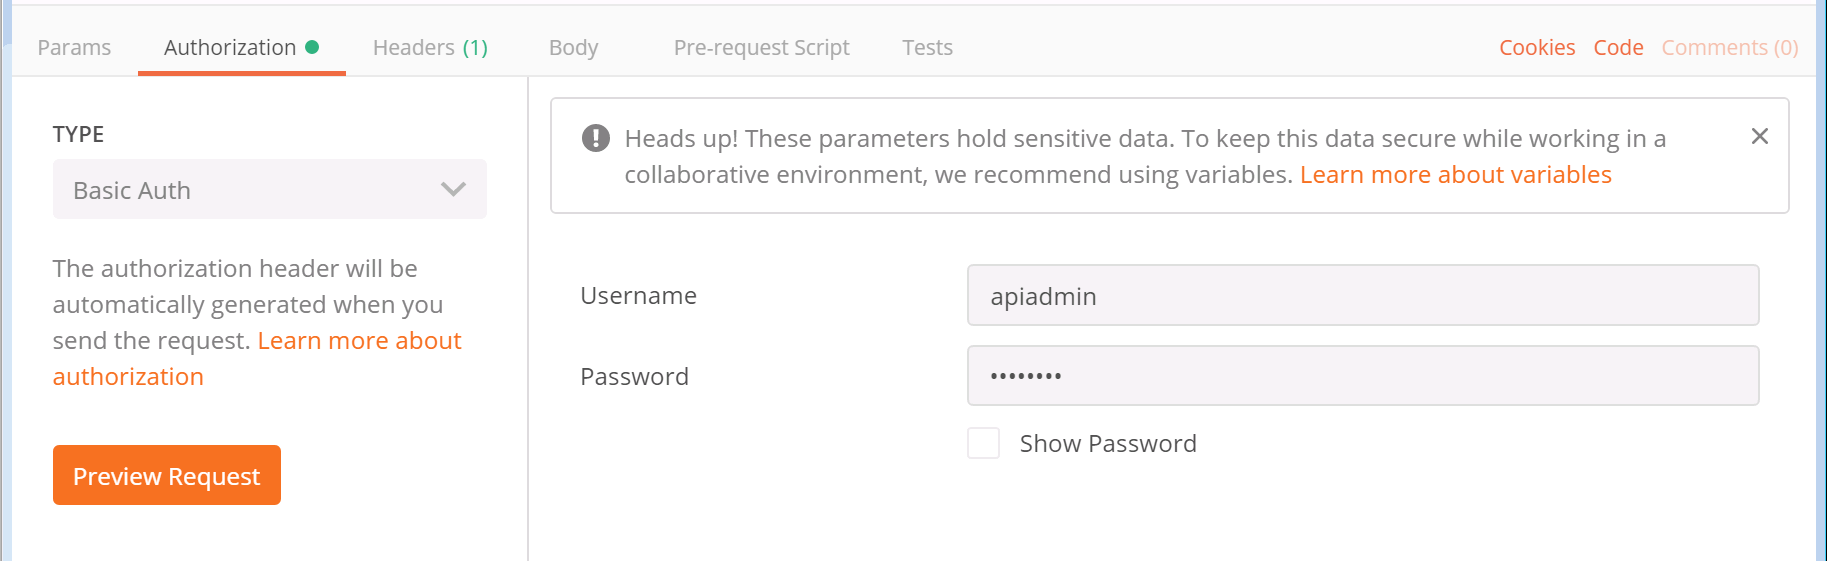
Before you can send the necessary request, you must learn how to pass these parameters using Postman. Follow these steps to construct your POST request to add the LDAP servers.
- Launch Postman
- In the box that specifies the verb, make sure it is set to POST.
- Change the URL field to https://cms1a.pod4.cms.lab:8443/api/v1/ldapServers
- Click on the Body tab below the URL.
- If not already selected, select the x-www-form-urlencoded radio button. This takes the text we enter and, if necessary, converts certain characters into a format that the web service can understand.
- Based on the API documentation above, you must provide quite a few parameters. Click on the
Bulk Edit selection at the right of the Key/Value headers in order to enter
all the parameters at once.
- In the entry area below the entry mode selection changes to a free-form text box. Select and remove any old information from previous API queries.
-
Now let's review the required parameters. In Bulk Edit mode you can enter
them all at once with each key/value pair on a line separated be a colon. Click copy on the box at the
right below
Parameter / Key Value address 10.0.224.140 portNumber 636 username CN=ldap,CN=Users,DC=cms,DC=lab password c1sco123 secure true Bulk Edit Parameters to copy:address:10.0.224.140 portNumber:636 username:CN=ldap,CN=Users,DC=cms,DC=lab password:c1sco123 secure:true - Click Send. Your inputs and the result should look like this:


As with the last POST request you performed, there is no body to the response but you can see that the Status for the response is a 200 OK which indicates the request was successful.
The best way to verify your configuration is to simply leave the URL and everything as-is, but change the POST to a GET and click Send again. In the response area at the bottom, you should make sure the Body has the Pretty display setting selected. The response should look like this:

You can now verify that the data you entered was set properly on the server. You see the address, port, username, and secure setting. You do not see the password, which is obviously a security feature. Notice that you also see an ldapServer id field. This is important because it uniquely identifies this server configuration in the database. This ID is generated dynamically and therefore the ID on your server will not match the one shown in these screen shots. You will need this value later in the lab, however we will provide a link to retrieve it again at that time, so it is not necessary to record it at this time.
Add an LDAP Mapping
Now you can move to the next element, the LDAP mapping. The LDAP mapping maps attributes in the LDAP directory to attributes in CMS. Take a look at the API reference for the LDAP Mapping configuration.
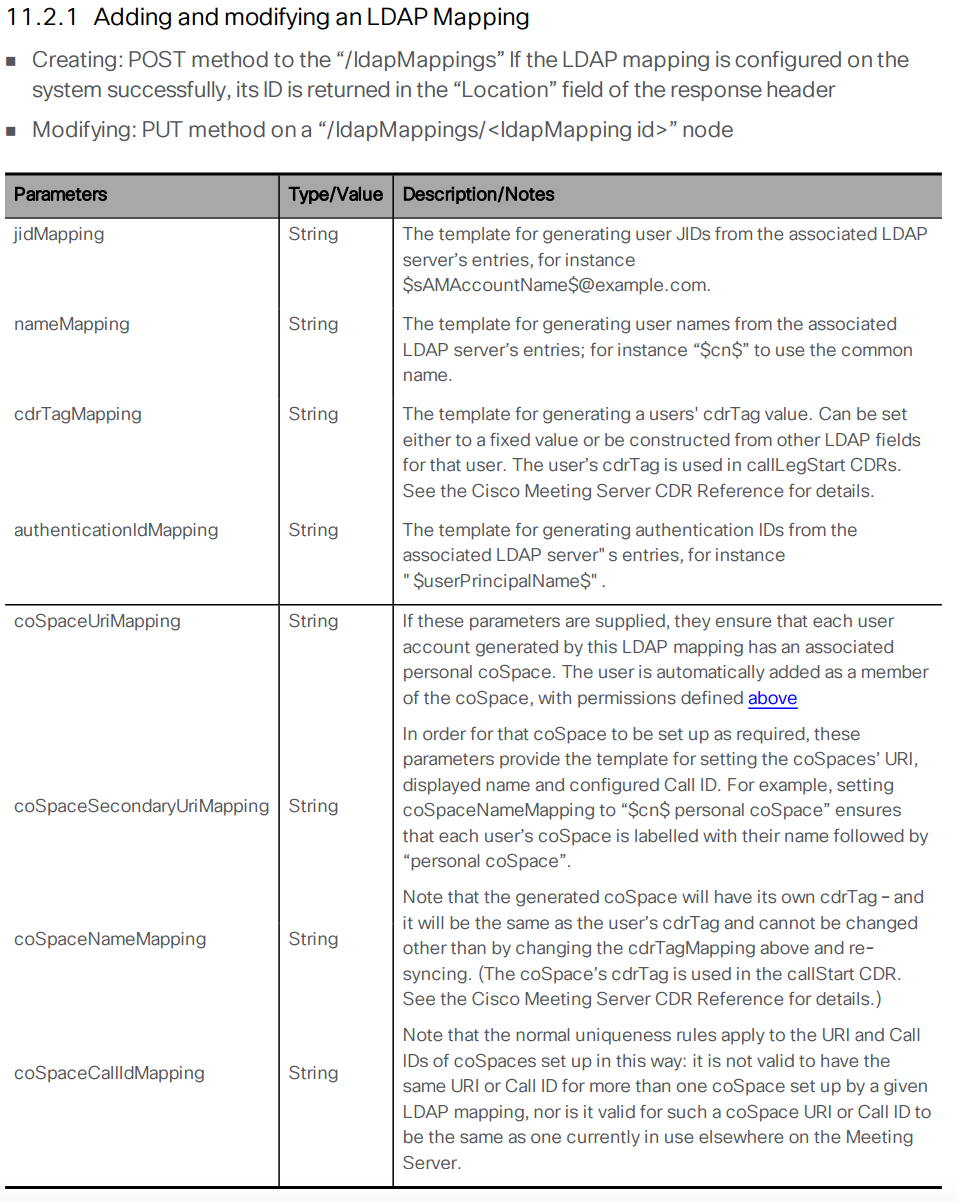
The following section takes you through configuring the LDAP Mapping. In the table below, the Parameter is the name of the attribute on the CMS side and the Value field represents the name of the object on the LDAP server. Follow these steps to configure your LDAP Mapping:
- Launch or switch to the Postman app
- Switch to the POST verb.
- Set the URL to: https://cms1a.pod4.cms.lab:8443/api/v1/ldapMappings
- Click on the Body tab.
- Underneath the Body header, make sure the x-www-form-urlencoded radio button is selected.
- Configure the following parameters for the request. Before doing so, select all of the old information
and remove that first.
Pay attention to the descriptions that explain why these specific parameters are being chosen below in
the table. Also notice that the actual parameters from the LDAP server are specified between two
dollar sign symbols ($). This allows you to use and modify the attribute by appending or applying a
transformation to the attribute that comes from the LDAP directory. Since there are quite a few
parameters, again it makes sense to take advantage of the Bulk Edit entry mode with the information
shown under the table.
The following are the parameters for Bulk Edit mode.Parameter / Key Value jidMapping $sAMAccountName$@conf.pod4.cms.lab
Description: The JID represents the login ID of the user into CMS. Because this is a Microsoft Active Directory LDAP server, the CMS JID maps to the sAMAccountName in LDAP, which is essentially the user's Active Directory login ID. Also notice that you are taking the sAMAccountName and appending the conf.pod4.cms.lab domain to the end of it because this is the login your users will use to log into CMS.nameMapping $displayName$
Description: This maps what is contained in the displayName Active Directory field the the user's CMS name field.coSpaceNameMapping $displayName$'s Space
Description: This will create a CMS Space name based on the displayName field, such as "John Smith's Space". This field, along with the coSpaceUriMapping field are what are required for a Space to be created for each user.coSpaceUriMapping $sAMAccountName$.space
Description: The coSpaceUriMapping field defines the user portion of the URI associated with the user's personal Space. As you will see later, certain domains are configured for dialing into a space. If the user portion matches this field for one of those domains, the call will be extended into this user's Space. This will become clearer when you complete the call routing portion of the configuration later.coSpaceSecondaryUriMapping $telephoneNumber|'/^.1919(.......)/7\1/'$
Description: This defines a second URI to reach the Space. You will use this to add a numeric alias to route calls into the imported user's Space as an alternative to the alphanumeric URI defined in the coSpaceUriMapping parameter. In this example, you want a number to be associated with the space based on the user's telephone number as defined in Active Directory. This command uses a transformation (similar to the UNIX sed program). The telephoneNumber values configured in Active Directory are in +E.164 format. For example, +19195551212. This transformation performs a match based on the first section, between the first two / signs, in this case ^.1919(.......). Just like in regular expressions, the ^ sign signifies the beginning of the string and the dot is a wildcard for any character. The parentheses are used to group portions of the match so that they can be used in manipulations later. In this example, ^.1919(.......) matches the number +19195551212. The next part of the line (between the / characters) is 7\1. This means that it will replace what it matched (+19195551212) with the number 7, plus the part of the match that was in parentheses, the last 7 dot's, or 5551212. In this example, if the number in active directory is +19195551212, the coSpaceSecondaryUriMapping will have a value of 75551212.
jidMapping:$sAMAccountName$@conf.pod4.cms.lab nameMapping:$displayName$ coSpaceNameMapping:$displayName$'s Space coSpaceUriMapping:$sAMAccountName$.space coSpaceSecondaryUriMapping:$telephoneNumber|'/^.1919(.......)/7\1/'$ - Once you have verified the above information is entered properly, click Send.
You should again see the Status indicate 200 OK. You can verify the configuration by switching from a POST to a GET and then clicking Send. You should see response similar to the response below:
You might be wondering why the output does not show you all the parameters you configured. You should see the ldapMapping ID that identifies the newly created object along with the jidMapping and the nameMapping. As often is the case, the other settings are only visible if you query the object itself. In order to query the object itself, you need to append the ID for the item you want to retrieve to the URL.
For example, if the ldapMapping id is <ldapMapping id="e5c2bfab-0616-4903-abbc-ea1d4301d116"> (it will be different in your results), copy the ID value (e5c2bfab-0616-4903-abbc-ea1d4301d116 in this example) and append it to the URL that is already in Postman. Your URL should end up looking something like this: https://cms1a.pod4.cms.lab:8443/api/v1/ldapMappings/e5c2bfab-0616-4903-abbc-ea1d4301d116. Once you have the new URL in place, click Send again.
Now you see the full configuration for the LDAP Mapping. Notice how the coSpaceSecondaryUriMapping some of the characters changed? That is due to the x-www-form-urlencoded method of entry we selected. All of this is documented in the API guide, but after a bit of familiarity and practice working with these APIs, you will find that this type of lookup is very common. You will need the value of the ldapMappings ID in the next part of the lab, but we will provide a link to retrieve it at that time, so there is no need to note it down right now.
Add an LDAP Source
An LDAP server and an LDAP mapping is configured. Now you need to tie the two together by creating an LDAP source. Take a look at the API reference for the LDAP Source configuration:
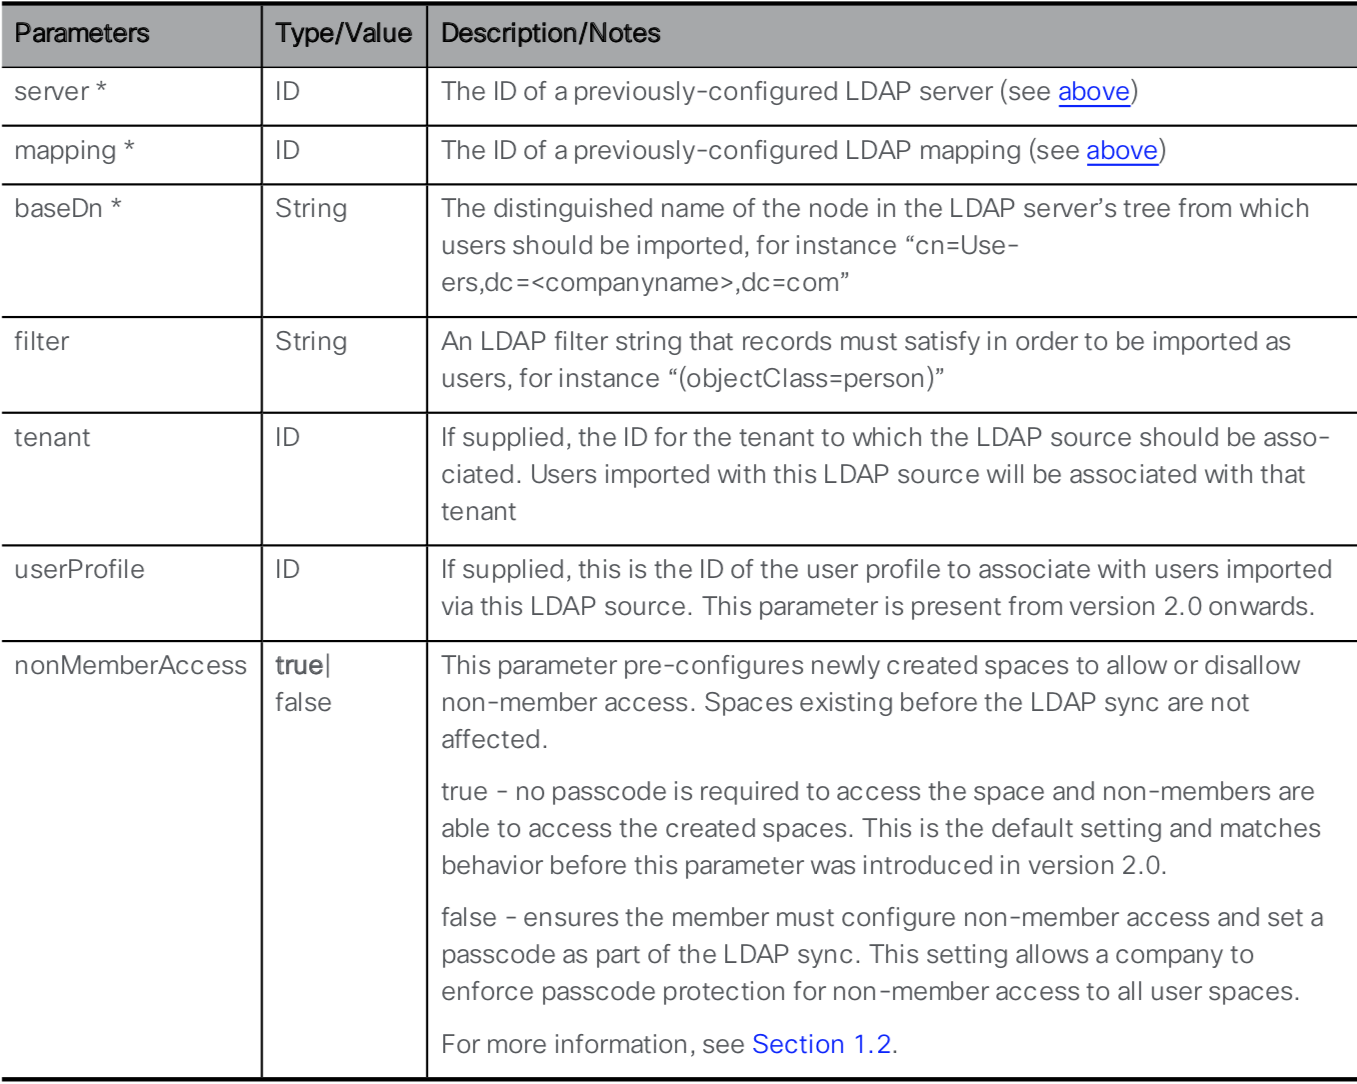
You can see that the LDAP Server and LDAP Mapping are required parameters for this API call, along with several other mandatory and optional parameters. To retrieve the necessary ID values, you will need to use the API. The links to retrieve them are provided below. Go through the following steps to configure the LDAP Source:
- Launch or switch to the Postman app
- Switch to the POST verb.
- Set the URL to: https://cms1a.pod4.cms.lab:8443/api/v1/ldapSources
- Click on the Body tab.
- Below the Body header, make sure the x-www-form-urlencoded radio button is selected.
- For this process, it may be easier to switch back to Key-Value Edit mode by clicking on the Bulk Edit button at the right side of the Postman screen.
- Review the following Key / Value pairs in the table below. Notice that the parameters entered in Bulk Edit
mode are retained, so you will likely show 5 Key / Value pairs from the previous POST request. This
request requires has 4, so just use the 'X' on the right of the
Key / Value pair you want to remove from the list and then overwrite the rest with the following
information:
Parameter / Key Value server ldapServer ID
This is the ldapServer id value from GET /ldapServers (username admin and password c1sco123)mapping ldapMappings ID
This is the ldapMappings ID value from GET /ldapMappings (username admin and password c1sco123)baseDn CN=Users,DC=cms,DC=lab filter (&(memberOf=CN=Pod4,CN=Users,DC=cms,DC=lab)(objectClass=person))
This filter looks at all LDAP/Active Directory objects that are of an objectClass of person that are members of a particular Active Directory security group, (CN=Pod4,CN=Users,DC=cms,DC=lab). Any user added to this group in Active Directory will be imported into CMS. - Once you have entered all the Key / Value pairs, click Send and verify a 200 OK response.

Perform LDAP Synchronization
Now that the LDAP configuration is done, you can perform a manual sync operation. There's two ways to do this - through the Web Admin GUI or through the API.
To perform the sync via the Web Admin GUI, do the following:
- Log in to the CMS server's Web Admin GUI at https://cms1a.pod4.cms.lab:8443 (username: and password: )
- Navigate to Configuration > Active Directory. You'll notice that the page has no configuration on it. This is because this page only shows locally configured LDAP information and does not show what is in the database.
- At the bottom of the page, select the Sync now button. This works even though there is no visible configuration of the LDAP configuration from the database.
- The sync should complete in a matter of seconds because you are only importing 4 users in this lab. To see the imported users in the Admin GUI, navigate to Status > Users. You should see four users imported.
- Navigate to Configuration > Spaces, where you can see the four Spaces created (and you could create additional ones)
Alternatively, you could have performed the sync using Postman by sending a POST request to the URL: https://cms1a.pod4.cms.lab:8443/api/v1/ldapSyncs, but at this point you won't see anything happening other than a 200 OK reply. You could also query the API via the browser for imported users and spaces using GET /api/v1/users and GET /api/v1/coSpaces.
Notice that for these Spaces, only the user portion of the URI is present. The domain or domains associated with these Spaces is not set here, but in the CMS Inbound call rules, which we will configure next.