Recording
One optional feature that CMS provides is the ability to record meetings to be viewed later by any or a portion of the attendees. The Recorder service provides the capability to record meetings and save the recordings on a Network File System (NFS) share. The recordings can then be retrieved later for consumption by attendees of a meeting. In addition to using the CMS Recorder service included with CMS, as of version 2.9 there is a new feature allowing recording of CMS meetings using a third-party SIP recording service. For the purposes of this lab, we will be demonstrating how to configure the built-in recording service, but it is important to be aware that the overall strategy for recording CMS meetings is in the process of changing so there are more options available to those administering the CMS environment.
Supported Deployments
CMS is flexible with regard to it's deployment options and may be used in several different ways:
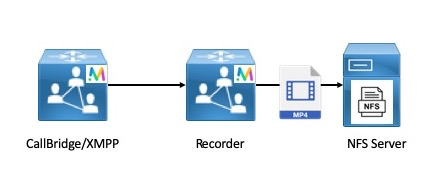
Cisco never recommends having the Call Bridge and Recording services co-resident on a single server due to scalability concerns. With this in mind, the first model recommended by Cisco is the One-to-One model where the Call Bridge services run on one node and the Recorder service runs on a different node. The recorder then sends the recordings to an NFS share on a remote server within the network.
|
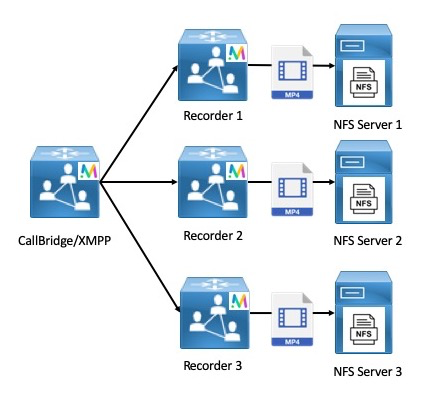
The One-to-Many or Redundant Recorder model is another method of deploying the recorder when a resilient recorder is needed. When using this method, recordings are load-balanced between all available Recording nodes. This means that every Call Bridge uses every Recorder node available.
|
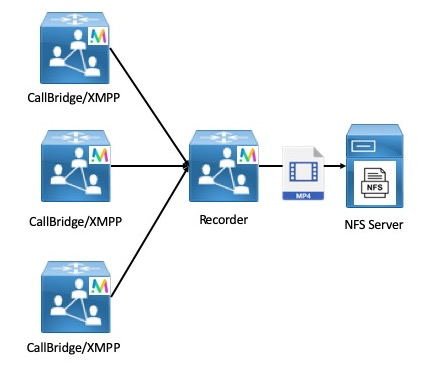
This concept of using all available Recorder nodes applies in the opposite direction as well where there are many Call Bridge nodes but only a single Recorder available. While this is supported, it is not necessarily recommended due to the obvious scalability concerns with a model like this.
|
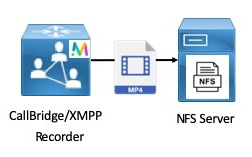
As stated earlier, it is not recommended to host the Call Bridge, and Recorder services all on a single CMS node. However, for demo as well as testing purposes it is supported and it is the method we will utilize in this lab to demonstrate the capability of the recorder.
|
XMPP Configuration
The CMS Recorder service acts as an XMPP client, so we need to configure the XMPP server on the Call Bridge being used as the Recorder. We will not concern ourselves with configuring XMPP clustering at this point; the way recording works natively is changing and in future releases it will not rely on the XMPP service, so we want to configure XMPP merely to show how recording is currently achieved, realizing that in future releases the specific configuration will change slightly, doing away with the need for XMPP.
First, let's configure the XMPP service on CMS1a:
| Cisco Meeting Server | Password |
|---|---|
| cms1a.pod7.cms.lab |
- Log into cms1a.pod7.cms.lab (password: ), then copy/paste the following:
xmpp certs cms1a.key cms1a.cer cmslab-root-ca.cer xmpp listen a xmpp domain conf.pod7.cms.lab xmpp enable
-
Next, we need to add the Call Bridges that have permission to connect to the XMPP server so the XMPP service is
aware of them. We will do this one by one:
cms1a> xmpp callbridge add cb-cms1a Success : true Callbridge : cb-cms1a Domain : conf.pod1.cms.lab Secret : zXx7lmXMeWkCmEzvAb1 cms1a> xmpp callbridge add cb-cms1b Success : true Callbridge : cb-cms1b Domain : conf.pod1.cms.lab Secret : PdyagitwSD5OT6PdAb1 cms1a> xmpp callbridge add cb-cms1c Success : true Callbridge : cb-cms1c Domain : conf.pod1.cms.lab Secret : 06y38CkEZCUB5UCaAb1Be sure to note the Call Bridge secret for each call bridge after you add them to the XMPP server. The secrets will be used in the next step below.
- Browse to the cms1a Web Admin page at https://cms1a.pod7.cms.lab:8443
- Enter your credentials (username: admin password: c1sco123) and press Submit
- Navigate to Configuration > General
- For the Unique Call Bridge name, enter cb-cms1a, the value you entered for the Call Bridge in the XMPP configuration in the previous section.
- On the Domain line, enter the XMPP domain, which is conf.pod7.cms.lab
- For Server address, we will enter the hostname of our XMPP server, cms1a.pod7.cms.lab
- Click the [change] link next to the Shared secret box
- In the Shared secret box, you need a copy of the shared secret that was generated on cms1a. You should have noted each shared secret in the steps above, but if not you can connect to the CLI and issue the command to get the shared secrets or click HERE to run a script that will retrieve them for you and display it in a popup web browser window. Copy the secret for cb-cms1a into the Shared secret box.
- Paste the same secret in the Confirm shared secret box
- Scroll down and click Submit
- Now navigate back to the Status > General page to see if the Call Bride service connected to the XMPP service successfully.
-
Repeat the above steps for the remaining Call Bridges by browsing to the Web Admin portal for
cms1b and
cms1c and entering:
- The Unique Call Bridge Name: cb-cms1b and cb-cms1c respectively
- The domain: conf.pod7.cms.lab
- The server address: cms1a.pod7.cms.lab
- The shared secrets for each Call Bridge
After completing the above steps, each Call Bridge should show the XMPP connection as connected. - Launch Postman using the desktop shortcut.
- Change the verb to POST.
- Enter the following URL in the address bar to target the recorders entity: .
- Send an empty POST and you should get back a 200 OK.
- Change the verb to GET and hit Send. You should see output similar to that below with the Recorder ID populated.
- Be sure to save the ID of the Recorder, we'll need it in the next step.
- Change the verb to PUT and set the URL to https://cms1a.pod7.cms.lab:8443/api/v1/recorders/### Your Recorder ID ###
- In the Body, add a key labeled and set the value to
- Hit Send
- We should get a 200 OK.
-
Click Invite Participants
- In the search field enter Pod7 User1
- Now hover over the Pod7 User1 entry and click the green call icon.
-
Click the +E.164 work number for that user to place the outbound call from CMS to the user.
-
This user will auto-answer, as we saw earlier in the lab.
-
Now, you should see the Record button on the Jabber client after clicking the
 button in the call window.
While CMS is recording, you will see the
button in the call window.
While CMS is recording, you will see the
 icon at the top left of your CMS conference window.
-
Wait about 30 seconds to record enough video to play back, then click the
 button after selecting
the button in the call window.
button after selecting
the button in the call window.
- Browse to http://recorder.cms.lab/recordings/?dir=pod7
- You should see a directory listing on the web server we're storing our recordings on. In this directory, CMS creates a subdirectory called spaces which contains subdirectories with a title in the format a long UID which represents the Space ID as CMS defines it.
- You can click on the directory containing your recordings and download the video to test it out.
- Open the video to view the recording you just created.
- When finished, navigate to Jabber to end the call. Disconnect Pod 7 User 1 by hovering over the user in the participant list,
right-clicking and selecting the Expel option. Now, hang up yourself by hovering over the video window and
clicking on the
 button.
 -
Explore Cisco Single Edge with Cisco Expressway and CMS:
- Learn about deploying the external WebRTC Web App using Cisco Expressway, to provide external users the same Web Bridge capability.
- Configure advanced Business-to-business calling with Skype for Business gateway calling.
- Investigate a Microsoft on-premise integration example, where you will learn about what is needed to configure a dual-home conferencing experience.
- Experience Cisco Meeting Management (CMM), our free product to allow video conference administrators to provide white-glove conferencing services.
Configure the Call Bridges to connect to the XMPP Server
Start with cms1a by following these steps:
You should see that the XMPP connection is in a connected state.
Recorder Configuration
Now that we have our XMPP server configured, we will focus on the actual Recorder-specific configuration. For the purposes of our lab we will also assume that the NFS server exists on our network and has been preconfigured with a share to store our recordings. In our lab we are using a Widows server for this purpose, but any NFS share will work. Let's start by connecting to the command-line of cms1a via SSH:
Now, we want to configure the Recorder service on cms1a. Because we are configuring the Recorder on the same CMS node as the Call Bridge service, we need to change the default configuration slightly. We want the CMS server to listen on it's local loopback so that cms1a can send recordings to itself and then forward them to the NFS server. We also want to configure the Recorder to listen on the 'a' interface so that the other Call Bridges in the cluster are able to send recordings to it. We must also specify a port to run the service on. We will select a port which we know does not already have another service running. To accomplish this, we will issue the commands below:
Once we've told the recorder to listen on the loopback as well as the primary network interface, we need to set the certificate file to be used by the recorder. We can use the certificate we already have on cms1a as well as the private key file used by the Call Bridge, let's specify those now with the command below.
We also need to add the certificate used by the Call Bridge to the Recorder trust store. Since we have a cluster, we need to specify the trust bundle we created earlier so that the Recorder will trust any of the Call Bridge nodes that might send recordings to it. We will specify that bundle with our command below:
Now that we have the certificates specified, we need to tell the Call Bridge where we want to send our Recordings. As mentioned earlier, this needs to be specified as an NFS path that exists on our network. We are sending our recordings to a Windows 2008 R2 Server running NFS services, but any NFS service will work. We will specify the hostname of the NFS server, as well as the directory to store the recordings.
We also want to set the resolution of our recorded meetings to 720p which will allow us to save a bit of space while not compromising video quality. Set the resolution by issuing the command below:
Next, let's enable the recorder service. If everything worked correctly, you should see a success message.
Add the Recorder to the Call Bridge Using Postman
Now that we've enabled the recorder service on the command-line, we need to add the recorder to the Call Bridge using the API. To do that, we'll launch the Postman tool.


Next, we'll get the Recorder ID of the Recorder we just created.

Now we'll set the URL of the Recorder on the Call Bridge.
Now that we have specified the Recorder address, we should be able to record our meetings manually. Let's try a test call to make sure we see the 'Record' button and are able to initiate a recording. Then, we'll download the recording and play it back to insure it worked correctly. Jabber should already be launched and registered. First, place a call to pod7user4.space@conf.pod7.cms.lab directly from the Jabber client.
|
|
|
|
Now that we're in a conference call, we can invite others to be part of the recording.
The CMS Recorder will now encode and write the video recording to the NFS share which will be available in a few moments.
Your recording should now be available to view in your Downloads folder.
MAIN LAB COMPLETE!
You've finished the main portion of the lab. There are multiple additional optional lab sections, depending on your time and interest, to continue on.