Creating CMS Spaces
As mentioned earlier, any meeting hosted by Cisco Meeting Server takes place in what is known as a Space. Before Cisco acquired Acano, this was referred to as a coSpace and in the API the older coSpace terminology still persists, so any API method mentioning a coSpace is referring to what we today call a Space. Spaces can be created either via the WebAdmin GUI or API.
Spaces can be created through a variety of interfaces:
- The WebAdmin GUI (under Configuration > Spaces) is simple to use, but has very limited options.
- The CMS API has methods to create Spaces individually or in bulk (via a separate API method, using a kind of template to create sequential Spaces).
- Spaces tied to individual users can be constructed using information found in one or more LDAP directories. You have already leveraged this option to create Spaces associated with your imported users.
Technically, any integration to Unified CM for Ad-hoc conferencing leverages the API to dynamically create and remove Spaces on demand, as well.
While some configuration options can be made to an individual Space, all CMS settings related to call treatment and user experience in a Space are defined by a hierarchy of settings. Consider the following diagram. The values lower in the hierarchy will always override those in the higher, up to the global/system level. However if nothing is explicitly set in the lower profiles, then the higher level settings will be inherited.
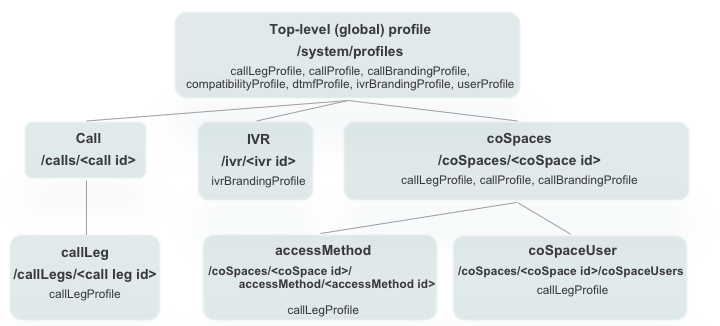
For instance, the coSpaces object, which you can think of as a Space, can have settings defined via a callLegProfile (among other things) that are different from the global system profile. But within this coSpace, an individual coSpaceUser may have settings via a different callLegProfile that will override the coSpace's. This is how you can create, for example, a default layout with a different default for certain Spaces, with yet a different layout for certain individuals in the Space.
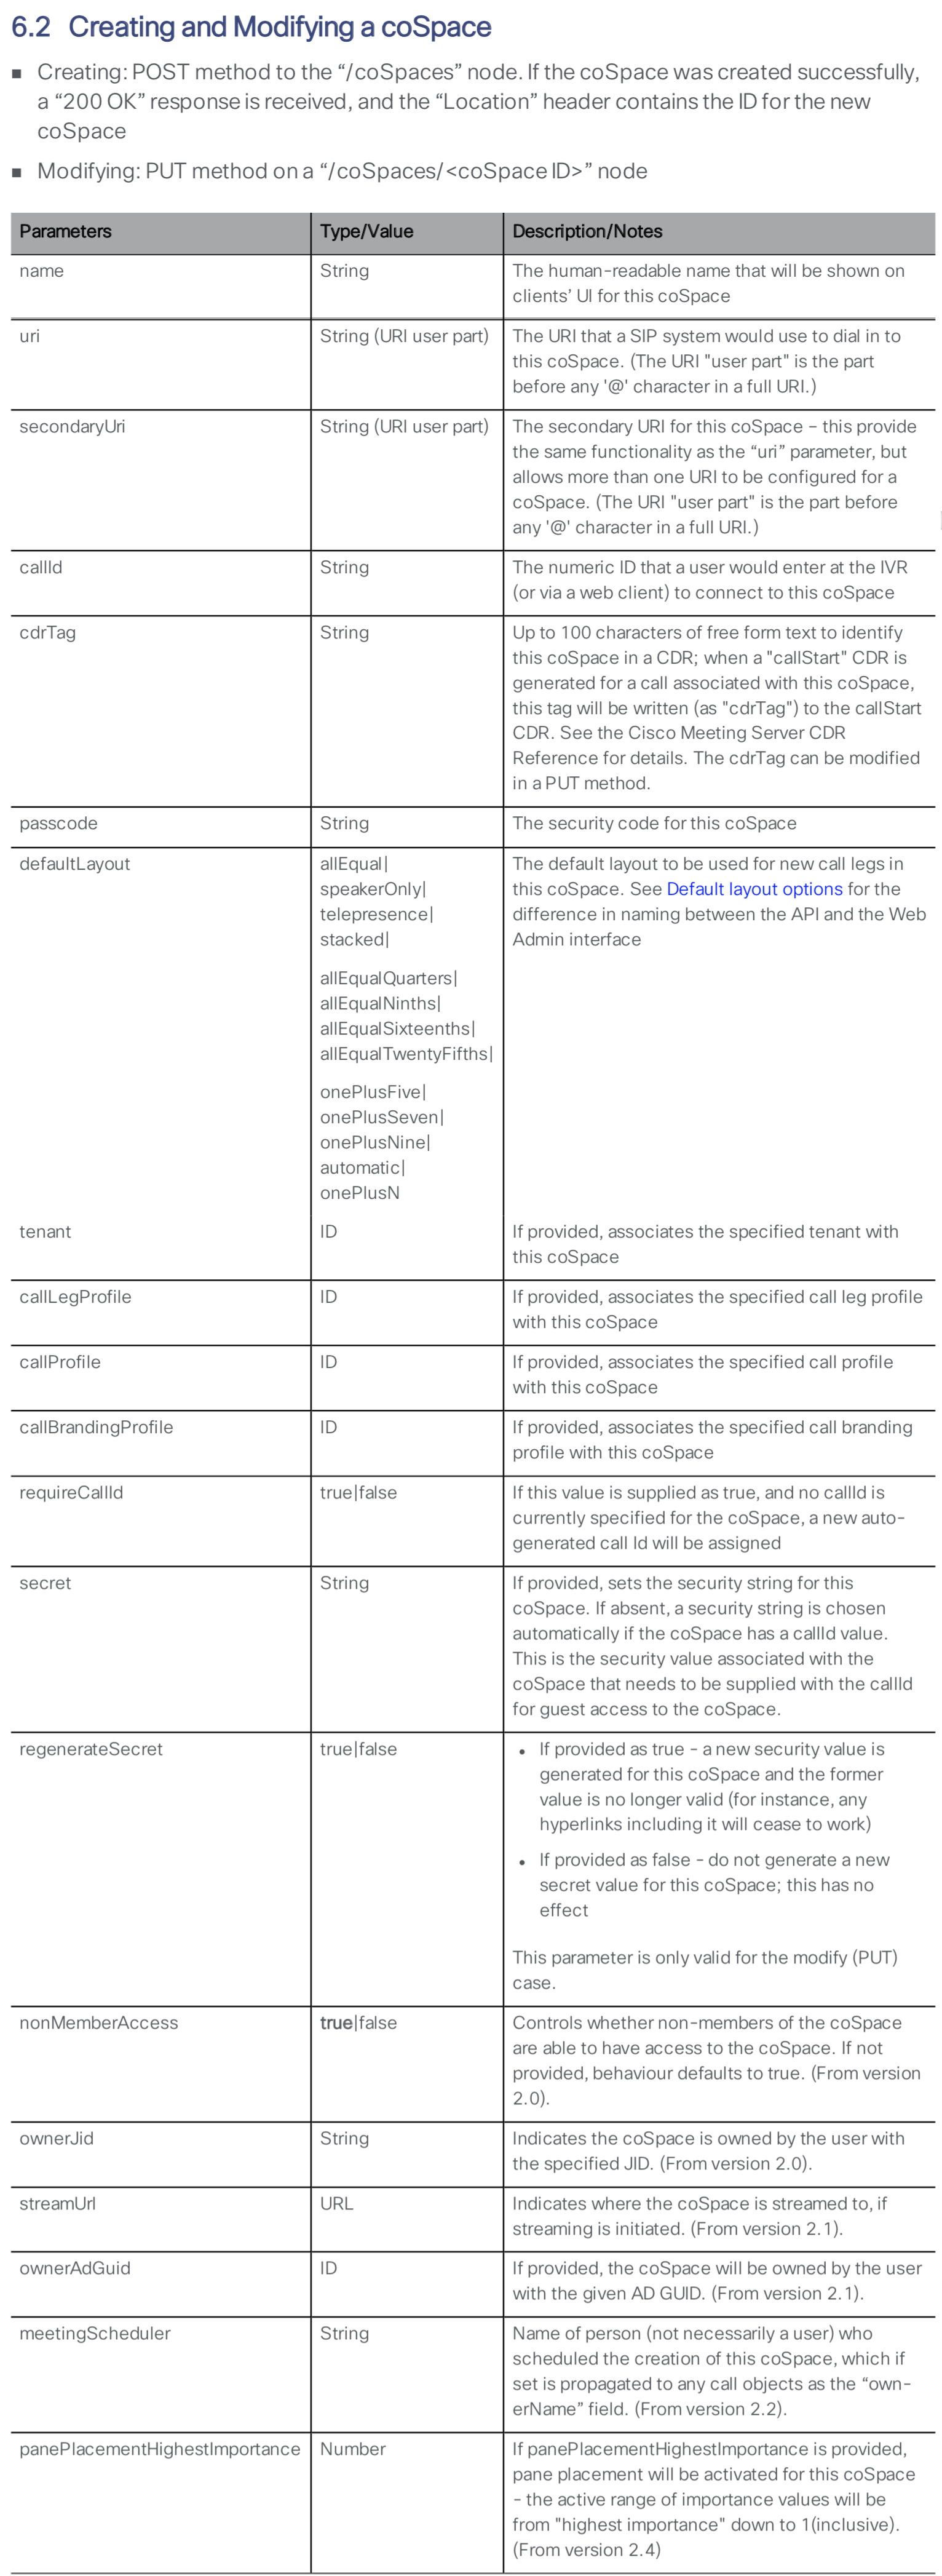
To create a simple Space, first take a quick look at the coSpaces server section of the API reference. The first thing to look at is to see if there are any mandatory parameters. These would have a * by the Parameter name. For creating the Space there are none, so we can simply peruse the guide for interesting settings:
For purposes of the lab, you will create a simple Space using the API that we will then configure further.
- In Postman, change the verb to POST
- Make sure the URL field is set to (without the previously deleted coSpace ID): https://cms1a.pod7.cms.lab:8443/api/v1/coSpaces
- Click on the Body tab below the URL.
- If not already selected, select the x-www-form-urlencoded radio button. With this checkbox selected, Postman automatically takes care of encoding the information for you. Alternatively, you could pick the Raw format and encode the information manually using something like https://www.freeformatter.com/url-encoder.html. One of the advantages of Postman is its ability to do this all for you.
- Although based on the API documentation above there are no required parameters, you will enter
the following:
Parameter / Key Value name LTRCOL-2250 uri pod7 Instead of entering these key/value pairs separately, you can toggle to Bulk Edit mode so you can now enter them all at once by pasting the following into the Bulk Edit window:
name:LTRCOL-2250 uri:pod7 - Click Send. Your inputs and the result should look like this:


- Now place a call to pod7@conf.pod7.cms.lab to confirm functionality.
|
|
|
|
Space Access for Host and Guest
Suppose you would like to configure this Space such that by default, people who call it will enter Guest access and are placed in a waiting room until a Host calls (using a different URI) and enters a passcode. To do this, you will create two callLegProfiles, one for the guest call behavior and another for the guest. Then the guest callLegProfile will be associated with the coSpace that you just created. The Host callLegProfile will then be attached to this same coSpace as an accessMethod.
- In Postman, change the verb to POST.
- Change the URL field to https://cms1a.pod7.cms.lab:8443/api/v1/callLegProfiles
- Click on the Body tab below the URL.
- Make sure the x-www-form-urlencoded option is checked.
- If necessary, switch click Bulk Edit at the right to switch to that entry mode. Clear out any old data in the entry window.
- Create the Host callLegProfile using the Bulk Edit settings at right:
Parameter / Key Value Description needsActivation false This callLegProfile will allow the caller to contribute audio and video. I.e. they are a "full/activator” participant defaultLayout speakerOnly speakerOnly is a full screen layout of only the host presentationContributionAllowed true Allowed to share content rxAudioMute false Allowed to send audio. Whether to block receiving audio from this call leg rxVideoMute false Allowed to send video Instead of entering these key/value pairs, you should toggle to Bulk Edit mode and enter them all at once by pasting the following into the Bulk Edit window:
needsActivation:false defaultLayout:speakerOnly presentationContributionAllowed:true rxAudioMute:false rxVideoMute:false -
Press Send
- Create the Guest callLegProfile using the Bulk Edit settings at right:
Parameter / Key Value Description needsActivation true This callLegProfile requires a "full/activator” participant (i.e. a host) to join first defaultLayout speakerOnly speakerOnly is a full screen layout of only the host presentationContributionAllowed false Not allowed to share content rxAudioMute true Block receiving audio from this call leg rxVideoMute false Allowed to send video deactivationMode deactivate What to do when the last "activator" (host) leaves. In this case, participants will be removed from the meeting. Instead of entering these key/value pairs, you should toggle to Bulk Edit mode and enter them all at once by pasting the following into the Bulk Edit window:
needsActivation:true defaultLayout:speakerOnly presentationContributionAllowed:false rxAudioMute:true rxVideoMute:false deactivationMode:deactivate -
Press Send
-
Next associate the Guest callLegProfile with the created coSpace. To do this, you will need both the the ID of
the coSpace created previously as well as the ID of the Host callLegProfile.
GET /coSpaces from the browser.
- In Postman, change the method from POST to PUT, since this will be a modification of an existing object.
- Change the URL to https://cms1a.pod7.cms.lab:8443/api/v1/coSpaces/###COSPACE ID for LTRCOL-2250###
- In the Body tab, make sure x-www-form-urlencoded is selected.
- Ensure Bulk Edit mode is selected and overwrite anything in the Body window with
- Press Send
-
Finally, create the Host accessMethod on the same Space.
- In Postman, change the method from PUT to POST
- Append /accessMethods to the URL, so that it reads https://cms1a.pod7.cms.lab:8443/api/v1/coSpaces/###COSPACE_ID###/accessMethods
- In the Body tab, make sure x-www-form-urlencoded is selected.
-
Ensure Bulk Edit mode is selected and overwrite anything in the Body window with
uri:host callLegProfile:###HOST_CALL_LEG_PROFILE### (The one with needsActivation set to False) passcode:111
- Press Send
- Now place a call to pod7@conf.pod7.cms.lab from both PC1 and PC2 to join as a guest. You'll hear the "Waiting for your host to join" prompt.
- Then place a call to host@conf.pod7.cms.lab to join as the host.
-
When prompted hover over the Jabber video window, click the
 icon and enter 111#. The other participants are immediately joined to the meeting and are muted.
- When finished, remove the remote participants and hang up the call.
SECTION COMPLETE!
You've finished this portion of the lab. We have multiple other optional lab sections, depending on your time and interest, to continue on.
-
Understand other CMS features, such as:
- Ad-hoc conferencing and integration with the Unified CM
- CallBridge Groups for load balancing calls
- Branding, for a more customized deployment.
-
Explore Cisco Single Edge with Cisco Expressway and CMS:
- Learn about deploying the external WebRTC Web App using Cisco Expressway, to provide external users the same Web Bridge capability.
- Configure advanced Business-to-business calling with Skype for Business gateway calling.
- Investigate a Microsoft on-premise integration example, where you will learn about what is needed to configure a dual-home conferencing experience.
- Experience Cisco Meeting Management (CMM), our free product to allow video conference administrators to provide white-glove conferencing services.