Test CMS Calls
At this point the Unified Communications Manager and Meeting Server have all the configuration needed for you to be able to place a call from Jabber on your laptop into a space. Jabber should already be launched and registered. Test dialing by URI by calling pod8user4.space@conf.pod8.cms.lab directly from the Jabber client.
|
|

|
|
Once that is successful, it's worth emphasizing that ActiveControl has negotiated. This means that the Jabber client realizes it is in a CMS conference. The regular ad-hoc conference button will be greyed out, but you can invite other users.
-
Click Invite Participants
- In the search enter Pod8 User1
- Now hover over the Pod8 User1 entry and click the green call icon.
-
Click the Work URI (pod8user1@pod8.cms.lab) for that user to place the outbound
call from CMS to the user.
- This user will auto-answer, so as seen in the participant list, we have added them to the conference. If we right-click on the participant entry for Pod8 User1, we see the Expel option that gives us the ability to remove this participant from the conference.
Features such as the active conference participant list, ability to remove participants, as well as the layout
features, are available because we have a version at or later than Jabber 12.5 and have allowed ActiveControl on
our SIP Trunks by enabling Allow iX Application Media on the SIP Profile applied to our trunks
to CMS.
A number of these capabilities can be further customized in CMS. For instance, you will now add the ability to mute a remote participant in a conference by accessing the CMS API via Postman.
Leave the current conference up for the next section, since these changes are dynamic and you will make them system-wide:
- Launch Postman
- Make sure you have still specified the GET verb.
- Change the URL field to https://cms1a.pod8.cms.lab:8443/api/v1/system/profiles
- Click Send. Your Postman screen and the result should look like this:
- From the output, copy the callLegProfile id. This is the ID of the system profile, the one calls use by default.
- Change the URL field to https://cms1a.pod8.cms.lab:8443/api/v1/callLegProfiles/
- Paste this callLegProfile id at the end of the URL
- Change the verb from GET to PUT since you will now modify this existing callLegProfile.
- Click on Body
- Make sure x-www-form-urlencoded is selected
- Remove any old Key / Value pairs by clicking on the X next to their row.
- For the Key enter muteOthersAllowed
- In the Value field next to muteOthersAllowed, enter true
- Click Send. Your Postman screen and the result should look like this:
- Verify that you received a 200 OK message back, then return to the active Jabber call (or start another conference as in the previous steps if disconnected).
-
When you hover over the other participant in the conference, Pod8 User1. You
should now see the mute icon, which will turn red when clicked.
- Disconnect the remote user by right-clicking on on the user's name and selecting Expel in the context menu that .
-
Hover over the remaining video window and click the
 button to disconnect the call.


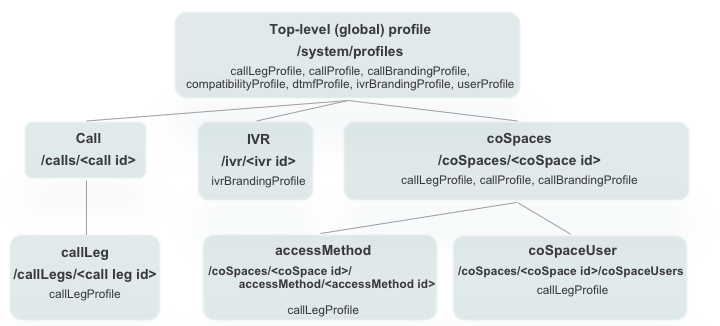
Keep in mind that this change was made to the callLegProfile associated with the systemProfile. If you recall the hierarchy below, this means that every Space, as long as it does not have a different callLegProfile that overrides this behavior, will inherit the ability to muteOthersAllowed property.
