Web Bridge API Configuration
In the Web Bridge section, we mentioned that you still need to configure the Call Bridge services to become aware of each Web Bridge service. Unless there is a direct one-to-one mapping of Call Bridges to Web Bridges, this configuration must be done via the API. This configuration requires us to use the POST request. Recall that you have deployed the Web Bridge 3 service on all three CMS servers.
API Reference
For this operation, you will need to use POST method of the /webBridges part of the API. It is worth pointing out that even though you just configured Web Bridge-related items on the CLI, they are not populated in the database. For instance, if you click to perform a GET on the webBridges object on CMS1a: https://cms1a.pod2.cms.lab:8443/api/v1/webBridges (admin / c1sco123), you'll see there are a total of 0 Web Bridges reported. This may come as a surprise as you have done some Web Bridge configuration already on the CLI. None of that configuration gets stored in the shared database, from which the API gets its information. To let Call Bridge know about the Web Bridge services you have enabled, you must add them to the database via the API.
Let us take a look at the requirements for a POST to the webBridges object in the API guide.
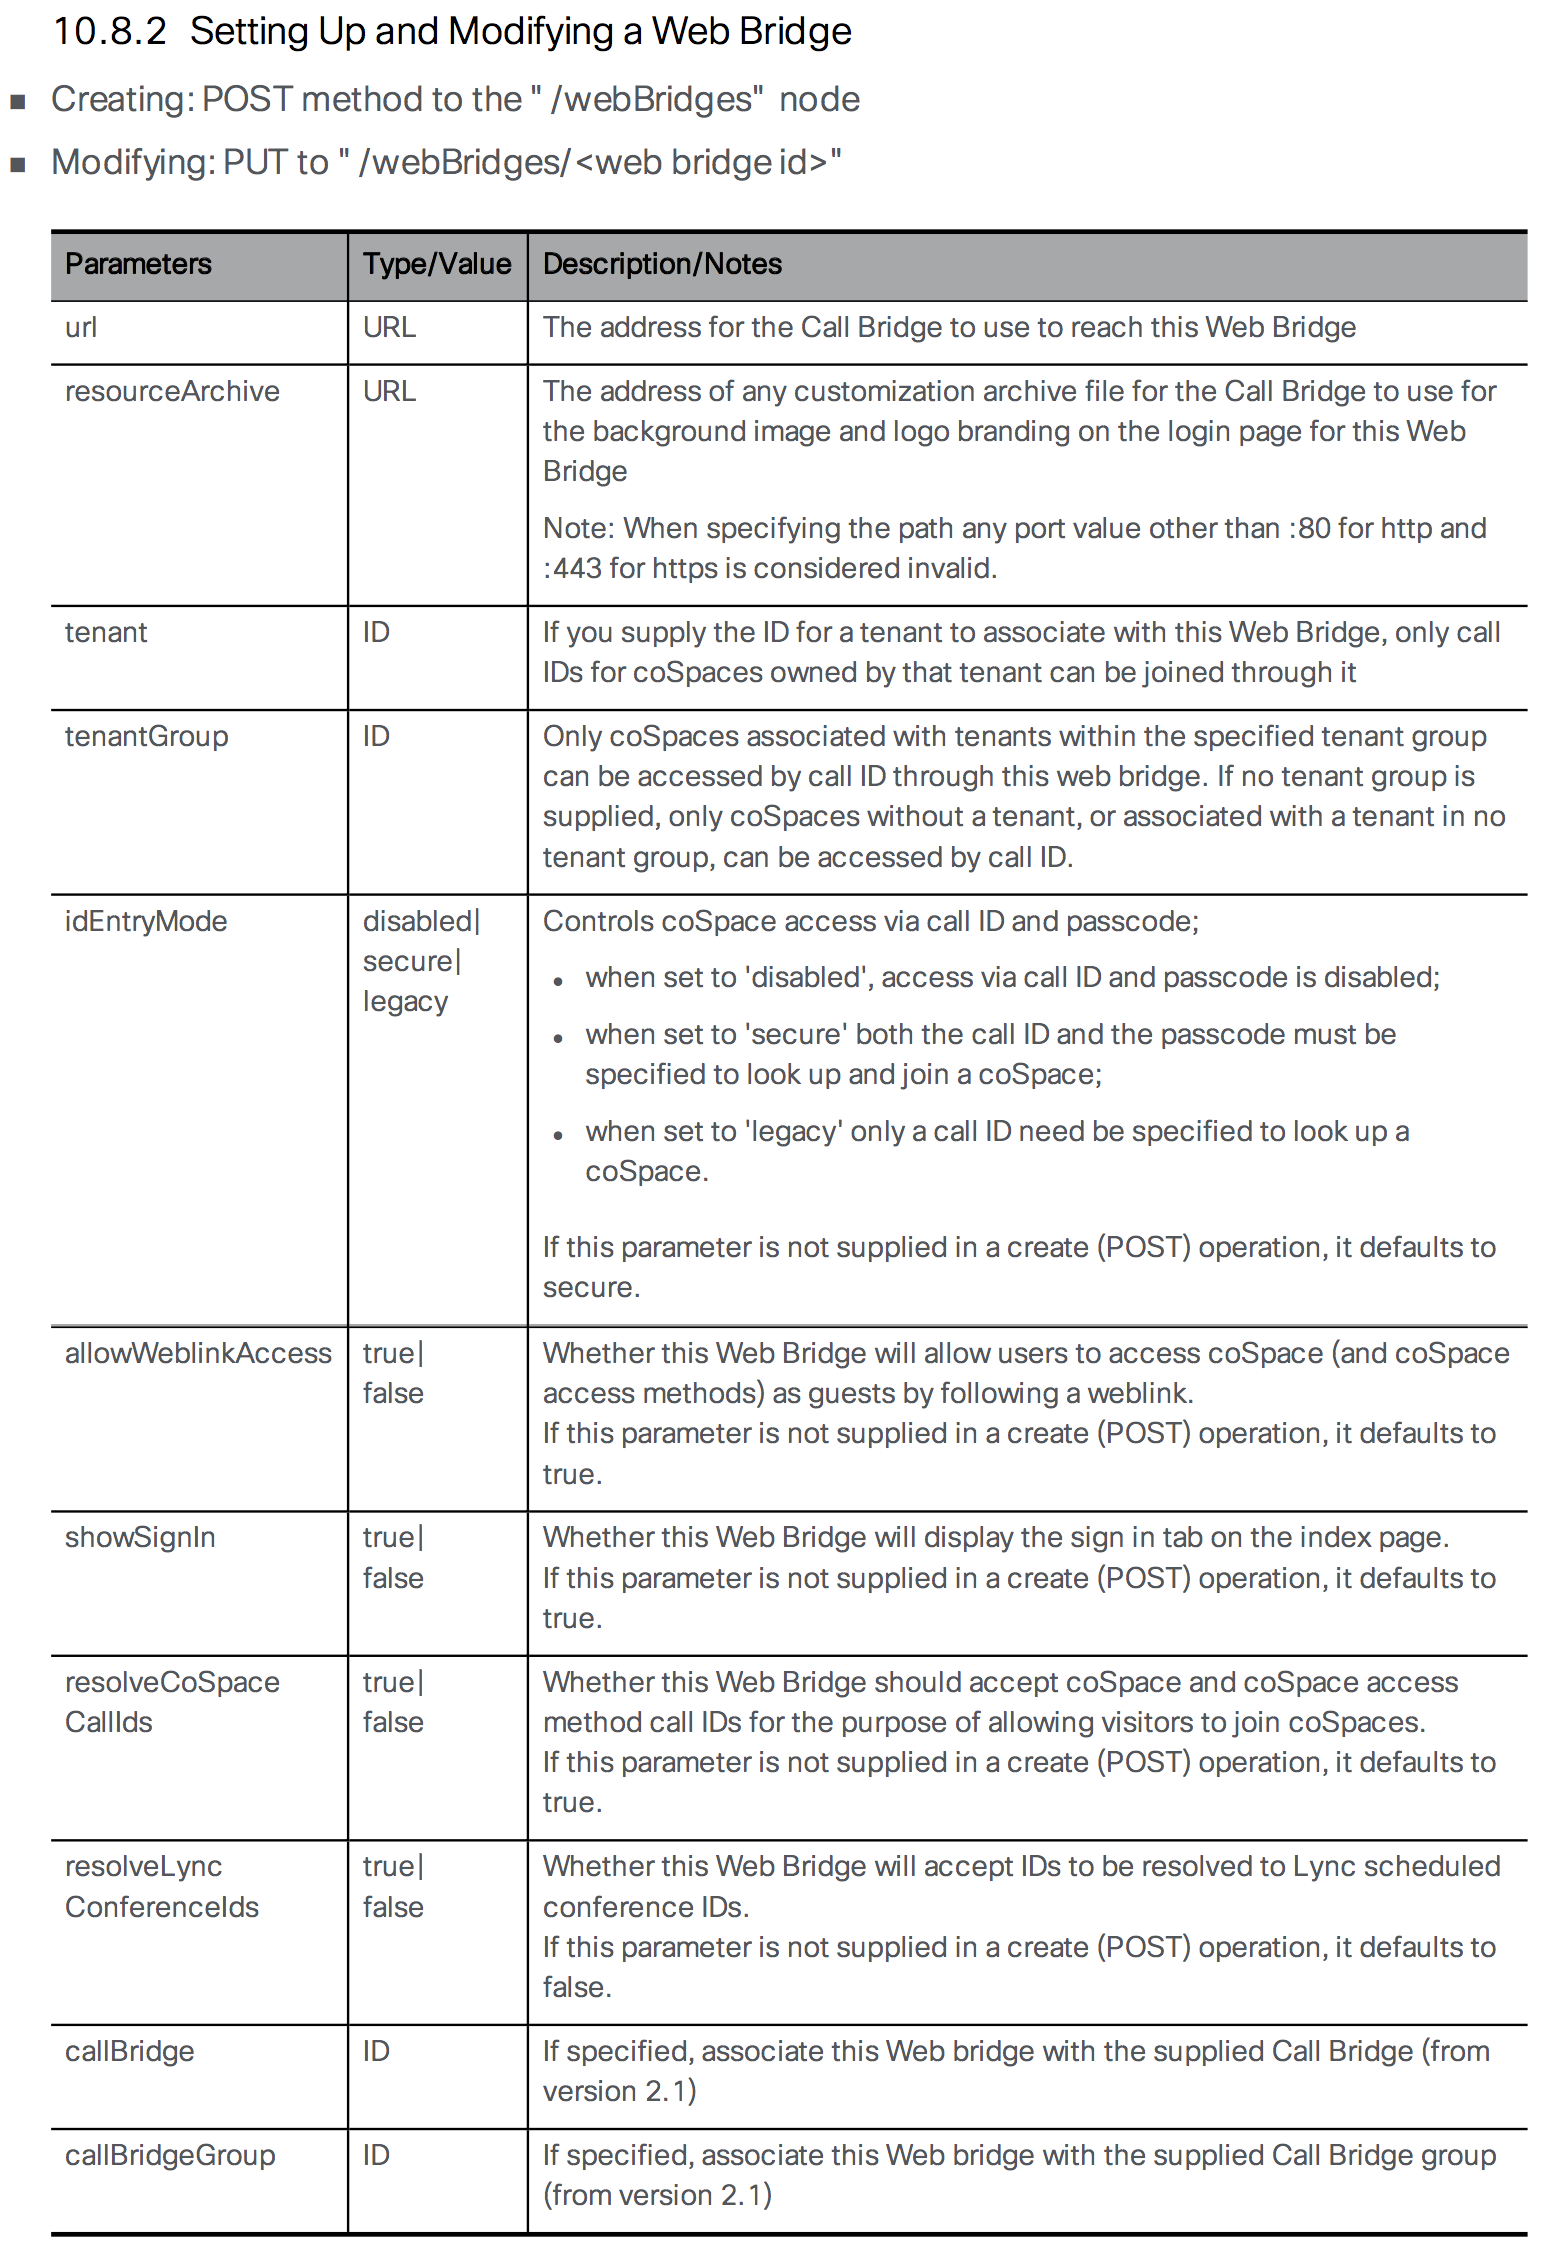
As is often the case, there are a lot of options. There is no * by any parameter, which indicates the field is required for the API, however to create a usable Web Bridge, you need to at least specify the url parameter. You are configuring the Call Bridge and telling it the URL of the Web Bridge. Prior to Web Bridge 3, this URL was in the form https://cms1a.pod2.cms.lab using the https:// protocol. If we were configuring Web Bridge 2, we could still use the HTTPS protocol, but with the newer Web Bridge 3 we will make use of the C2W protocol, so our URL will look like this: https://cms1a.pod2.cms.lab:4443 Recall that we configured Web Bridge to listen for C2W on port 4443, which is why we need to specify the port in this manner.
- In Postman, change the method to POST, because you are creating a new Web Bridge object.
- Set the URL to https://cms1a.pod2.cms.lab:8443/api/v1/webBridges. As with all requests, it could be sent to any server in the cluster and the data will be replicated.
- Just below the URL field, you should see a tab labeled Body. This option will be greyed out until you select the POST method. Select the Body tab to add parameters to the message body.
- Underneath the Body header, select the x-www-form-urlencoded radio button. With this checkbox selected, Postman automatically takes care of encoding the information for you. Alternatively, you could pick the Raw format and encode the information manually using something like https://www.freeformatter.com/url-encoder.html. Fortunately, Postman does this for you with this encoding setting.
- Based on the API documentation above, enter url under the Key heading. If there are other options, already present from a previous operation, clear them by clicking the X next to the row. Occasionally Postmay may be in Bulk Edit mode, you can switch back to Key/Value entry by clicking Key-Value Edit at the right. We'll use Bulk edit later.
- Enter c2w://cms1a.pod2.cms.lab:4443 next to it under the Value heading
- Click the blue Send button and verify a green 200 OK response.


You will notice the Body of the response will be blank on the bottom half of the screen, however Postman indicates the response status code next to the Status: field which should be 200 OK indicating that the request was processed successfully. You have now added one Web Bridge. Follow these steps to add the other two, then check the status:
- In Postman, verify that the UI still shows the POST operation and that the URL is correct, (https://cms1a.pod2.cms.lab:8443/api/v1/webBridges).
- Click on the Body tab if not already selected.
- Change Value for the url key to c2w://cms1b.pod2.cms.lab:4443, which is the URL for the second Web Bridge
- Click the Send button
- Now, assuming you got a 200 OK back, change the Value for the url key to c2w://cms1c.pod2.cms.lab:4443, which is the URL for the last Web Bridge
- Click Send
You should now have all the Web Bridges configured. Follow these steps to go back and confirm the three servers are entered properly.
- In Postman, change the method from POST to GET
- The URL should still be set to https://cms1a.pod2.cms.lab:8443/api/v1/webBridges. To prove that database replication is working, change the URL to point to a different Call Bridge. Change it to: https://cms1b.pod2.cms.lab:8443/api/v1/webBridges
- Click Send

If you followed the previous instructions correctly, you should now see all three Web Bridges on the list. You will notice that the output does not provide much detail. Many API requests will only return a UUID value for the object and you must query that object to get additional information about it. Note that the UUID values are unique and generated automatically, so the UUID values you see in this document will not match those in your environment. It is critical that any time you need a UUID value that you copy it from the output of your Postman client and not from this web page.
- In Postman, copy the long string called the webBridge id contained in the results of the previous GET request
- At the end of your URL in your GET request, put a forward slash ( /) character, and then paste the value of the id for your first Web Bridge. For example, the URL will look something like https://cms1b.pod2.cms.lab:8443/api/v1/webBridges/0a2ccba5-42ad-8e30-847c80c6e663 but with a different alphanumeric string.
- Click Send
This gives you the detailed configuration for this particular object. As you can see, some of the optional parameters that were specified in the API reference are shown. Referencing an object by ID as we just did is also how we will later modify (PUT) and/or delete (DELETE) objects. At this point, your Web Bridge and Call Bridge services should be functional. For it to be usable by end users, we will need to have accounts for them to log into.