Call Bridge Groups
While a Cisco Meeting Server Call Bridge cluster provides a scalable, redundant conferencing service, by default, CMS does not always make the most efficient use of the conferencing resources available to it and, at the same time, may simply allow a particular server to become over-subscribed.
For example, for a meeting with three participants, each participant may end up on three different Call Bridges. In order for those three participants to be able to participate in the same Space, the Call Bridges will automatically set up connections between all the servers to make the user experience seem like they are all on the same server. The unfortunate downside of this is that a single 3-person conference now consumes 6 media ports of capacity. This is obviously an inefficient use of resources, albeit a worst-case scenario. Additionally, when a Call Bridge is truly overloaded, the default mechanism is to continue accepting calls and provide service at a reduced quality to all callers on that Call Bridge.
These challenges are addressed by the Call Bridge Group feature. This feature was introduced in version 2.1 of the Cisco Meeting Server software and has been enhanced to support load balancing for both inbound and outbound calls, Cisco Meeting App (CMA), including WebRTC participants. This lab will introduce the principles and focus on load balancing of inbound calls.
To solve the over-subscription problem, three configurable load limits for each Call Bridge were introduced:
- loadLimit - This is the numeric maximum load for a particular Call Bridge. Each platform has a recommended load limit value, such as 700,000 for a CMS2000 (in version 2.6), 96,000 for a CMS1000 and 1,250 per vCPU for a Virtual Machine. Different calls consume a certain amount of load based on the resolution and frame rate of the participant.
- newConferenceLoadLimitBasisPoints (defaults to 50% of loadLimit) - sets point limit after which new conferences are rejected
- existingConferenceLoadLimitBasisPoints (defaults to 80% of loadLimit) - point value after which participants joining an existing conference will be rejected
While the feature was designed to address call distribution and load balancing, other entities, such as TURN servers, Web Bridge servers, and Recorders can also be assigned to Call Bridge Groups so that they, too, can be properly grouped for optimal usage. If any of those objects is not assigned to a Call Bridge Group, they are assumed to be available to all servers without any particular priority.
With these simple values, there are a few things to keep in mind:
- A "rejected" call really means that when extending a call to an overloaded Call Bridge, the CMS responds with a SIP 488 ("Not Acceptable Here") message. To the Unified CM, this is not a terminal failure, it simply tells Unified CM to route the call to the next available destination, controlled by standard Unified CM routing (implemented via Route List/Route Groups, Local Route Groups, etc). Not until all possible destinations are exhausted will the caller be rejected in some fashion.
- Distribution calls are never rejected. If a caller does get routed to a Call Bridge that is not hosting a call into a Space that is active on one or more other Call Bridges, this Call Bridge will always be able to join the caller to the Space hosted on another server.
- The amount of load a given call consumes is determined by the resolution, frame rate, etc, that the individual call leg has negotiated. These parameters are not configurable.
The other primary goal of the Call Bridge Group feature is to make sure that all participants within a Call Bridge Group accessing a particular Space will all be connected to the same server, thereby eliminating excessive distribution of calls between Call Bridge nodes. To make this happen, when a call is extended to a CMS to join a Space, the server will communicate with the other Call Bridge servers to determine which server is currently hosting the meeting. If it determines that a Space is being hosted by another server within the Group, then the destination serer will send a SIP INVITE with a Replaces header, essentially telling the Unified CM to transfer the call to it.
At the same time, if a meeting is hosted by a Call Bridge in one Call Bridge Group and someone wants to join from a different region and therefore dials in via a second Call Bridge Group, those calls will always be distributed between the servers in the different regions. The goal is to aggregate the calls for a Space on a single server within a given Call Bridge Group.
This feature imposes requirements on the call control. For Expressway, this means version X8.11 or later and the Meeting Server Load balancing option configured on Zones pointing to CMS, which is the default for all Zones using the Custom Zone profile.
For a CMS integration to Unified CM, this means Accept replaces header must be enabled in the SIP Trunk Security Profiles and each SIP trunk to CMS must have a Rerouting Calling Search Space configured to allow the call be be transferred between CMS SIP trunks.
Sample Test Call
To illustrate this problem you will add Search Rules to bypass Expressway that allow you to place a call to a CMS node's FQDN and have it be routed ONLY to that node specifically with no failover or redundancy.
To add these Search Rules, click HERE. You should see another window pop up with the results. The configuration may take a few seconds to complete.
Now you will place calls to the same Space from Jabber on the laptop, PC1 and PC2 to pod2user4.space using domains cms1a.pod2.cms.lab, cms1b.pod2.cms.lab, and cms1c.pod2.cms.lab
- Make sure you have Remote Desktop sessions up on PC1 (10.0.102.91) and PC2 (10.0.102.91)
- Using Cisco Jabber on your laptop, click/call our created Space at pod2user4.space@cms1a.pod2.cms.lab
- Check the active calls on CMS1A and you should see the call placed from Pod2 User 4: https://cms1a.pod2.cms.lab:8443/calls.html
- From PC1's Jabber client, call the same Space, but this time send the call to CMS1B by dialing pod2user4.space@cms1b.pod2.cms.lab. Check the call status on the CMS1A again. This call will use a different CMS server, in this case CMS1B, since we sent the call directly to the CMS1B host.
- From PC2's Jabber client, call the same space, but to CMS1C by dialing pod2user4.space@cms1c.pod2.cms.lab.
- You should now see each call on its own CMS, with two distribution links to the other two CMS nodes: All with username: admin password: c1sco123
- When finished, disconnect the remote callers first. Hover over each user in the participant list, right-click and select the Expel option.
-
Once all remote callers have been disconnected, hang up yourself by hovering over the video window and
clicking on the
 button
The behavior illustrated above is an inefficient use of resources and is what we will be addressing by placing CMS servers into Call Bridge groups. By using Call Bridge Groups, calls for the same Space will be kept on a single Call Bridge.
Creating Call Bridge Groups
There are three parts to configuring Call Bridge Groups and load balancing in CMS: creating Call Bridge Groups, enabling load balancing and relevant parameters; and applying the Call Bridge Group to the Call Bridges.
The first step to implementing Call Bridge Groups is to decide how to group your Call Bridges. You may choose to create groups by region, datacenter location, country, etc. For this lab, you will create a group called East, consisting of cms1a and cms1b, and a group called West, consisting only of cms1c.
Take a look at the API reference for the Call Bridge Group feature:
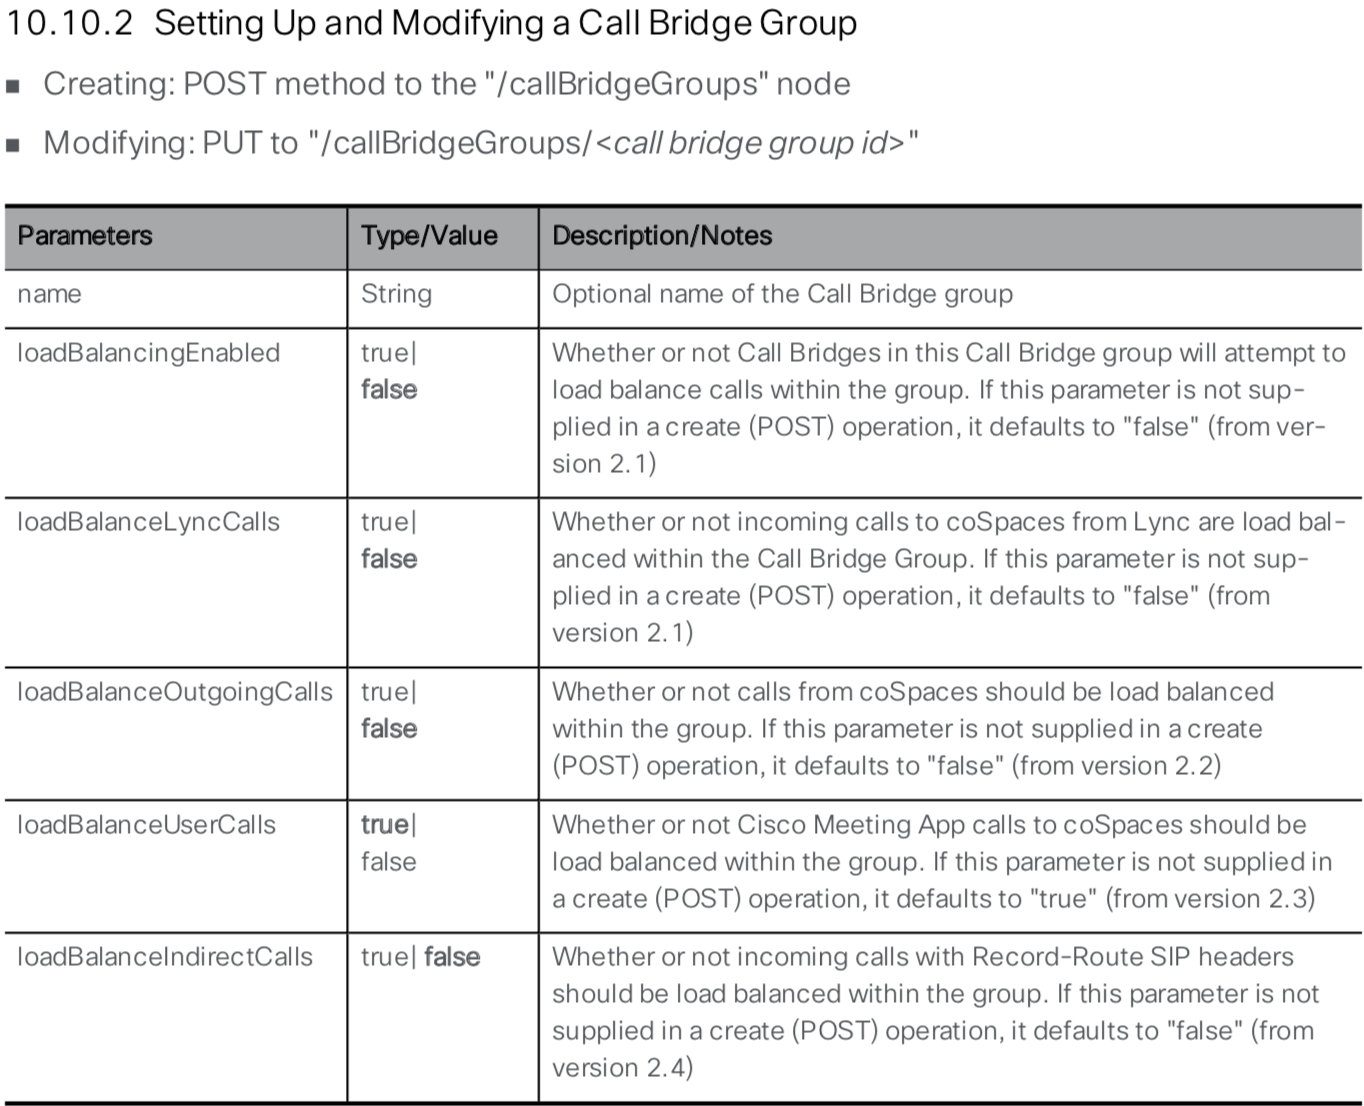
A quick look at the API reference shows that you need to give the new Call Bridge Group a name and can set loadBalancingEnabled to true. Since you are integrating with Cisco Expressway, you also need to set loadBalanceIndirectCalls to true.
- In Postman, the query type should be set to POST
- In the URL field, overwrite the existing URL with https://cms1a.pod2.cms.lab:8443/api/v1/callBridgeGroups
- Below the URL line, click on the Body tab
- Ensure the x-www-form-urlencoded box is selected
-
In the Body section, switch to Bulk Edit mode. Make sure any existing
information is removed and paste in the following:
name:East loadBalancingEnabled:true loadBalanceIndirectCalls:true
- Click Send
- Now add the West Call Bridge Group. In Postman, in the Bulk Edit portion, change East to West, or simply paste the following into the window, removing the previous information completely:
- Click Send
- Verify the two locations were created by changing the operation from POST to GET and click send. If the Body tab is selected in the results, you should see the two groups as below. Alternatively, you could click GET /callBridgeGroups to use your browser directly to retrieve these group IDs.
- Notice not all information is present in these results. Copy the ID field for the East Call Bridge Group from the popup window and append it to the base URL. The base URL is https://cms1a.pod2.cms.lab:8443/api/v1/callBridgeGroups. The completed URL will look something like https://cms1a.pod2.cms.lab:8443/api/v1/callBridgeGroups/5ff3e8f3-b234-475c-809d-e363a3289bcf
- Click Send


You have enabled load balancing at the Call Bridge level but you have not yet configured any of the load parameters, so they are set to the default values. You can look at the current settings by performing an API query. The following API reference documentation shows how to retieve these values:
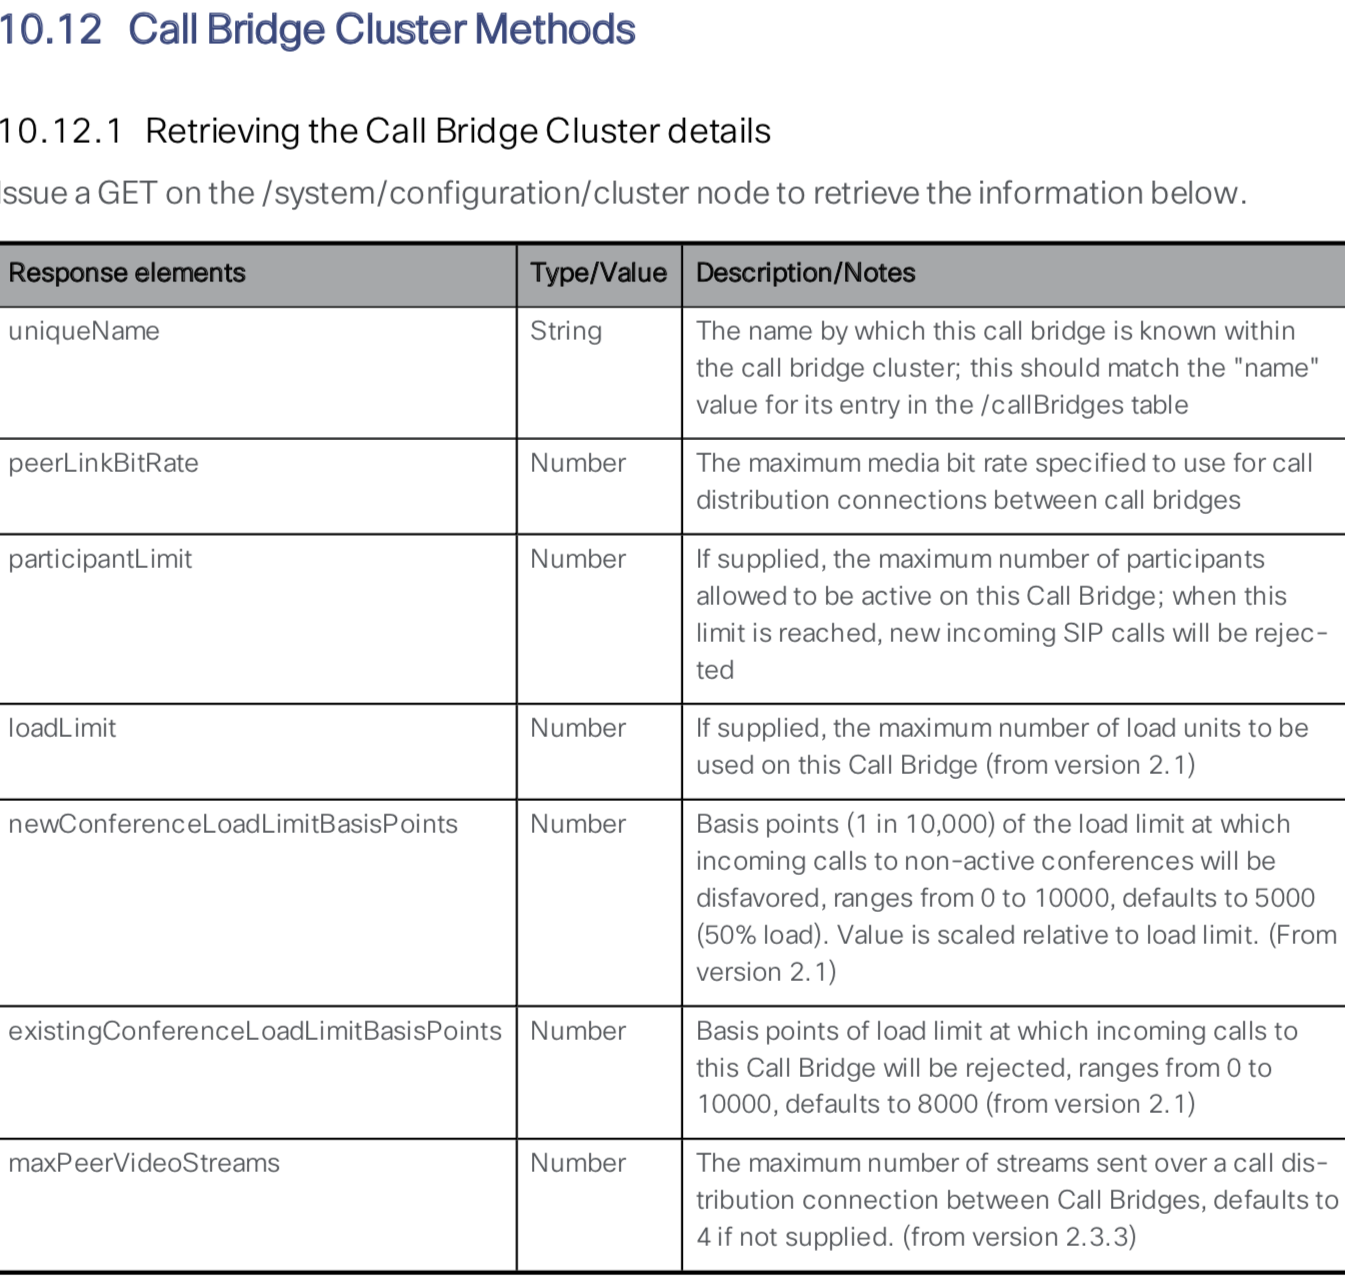
Follow these steps to perform a GET request to retrieve the Call Bridge Cluster details:
- In Postman, change the verb to GET
- In the URL field, enter the following: https://cms1a.pod2.cms.lab:8443/api/v1/system/configuration/cluster. Notice that you are querying cms1a. Each server has its own configuration because different servers in the cluster might be running on different hardware, and therefore require different settings.
- Click Send
- You can see that the Call Bridge currently has no load limit set. To get the recommended values,
refer to the product Release Notes and any release-specific Load Balancing whitepapers. As of t
he 2.5 release, the suggested limits are as follows:
System Load Limit Meeting Server 2000 500000 Meeting Server 1000 96000 X3 250000 X2 125000 X1 25000 VM 1250 per vCPU - For the purposes of this lab, the CMS servers are running as virtual machines with limited vCPU resources so you will set the value to 10,000. Switch the GET verb to PUT
- Select the Body tab below the URL
- Ensure that x-www-form-urlencoded is selected
- Make sure Bulk Edit mode is selected and remove any old data from the key/value box.
- Enter the following
- Click Send
- Check the result to ensure you received a Status of 200 OK.
- Remember that this value is specific to each Call Bridge in the cluster, which is nice if you have servers with different capacities all in a cluster. You should repeat this action for cms1b and cms1c. In Postman, set the verb back to a PUT
- Now you need to change the hostname in the URL from https://cms1a to https://cms1b. The full URL should be https://cms1b.pod2.cms.lab:8443/api/v1/system/configuration/cluster.
- Click Send
- Check the result to ensure you received a Status of 200 OK.
- Finally, change the URL hostname from https://cms1b to https://cms1c The full URL should be https://cms1c.pod2.cms.lab:8443/api/v1/system/configuration/cluster.
- With the verb still set to PUT, Click Send
- Check the result to ensure you received a Status of 200 OK.
- To verify, change the verb to GET
- Press Send
As you can see in response, the newConferenceLoadLimitBasisPoints and existingConferenceLoadLimitBasisPoints parameters are present for each system and could be changed exactly the same way with a PUT command.
Apply Call Bridge Group to a Call Bridge
You have set system level load parameters and defined two Call Bridge Groups. Now you need to assign specific Call Bridges to Call Bridge Groups. The API reference outlines how to do this:
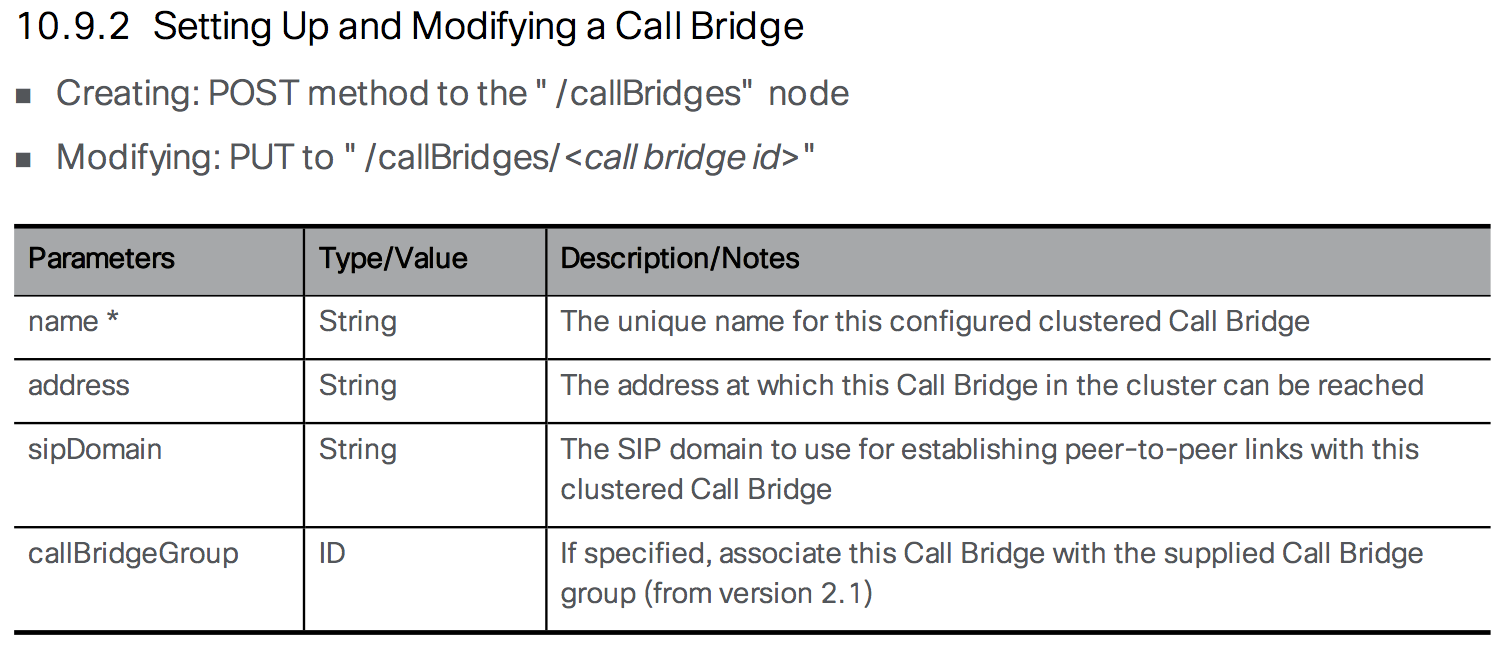
As you can see in the API Reference, you need to modify the /callBridges object and provide a callBridgeGroup. To do this, you need the ID values for both the Call Bridges as well as the ID's for the Call Bridge Groups. To retrieve this data, click to GET /callBridgeGroups and GET /callBridges. You could have used Postman to do these queries as well. Keep these two windows open so you can get the ID values for your queries.
Follow these steps to assign each Call Bridge to a Call Bridge Group. For this lab, we will assign the cms1a and cms1b to the East Call Bridge Group and cms1c to the West Call Bridge Group:
- Switch to Postman and change the verb to PUT
- Construct a URL with the base of https://cms1a.pod2.cms.lab:8443/api/v1/callbridges/ plus the Call Bridge ID for CB_cms1a from GET /callBridges. NOTE: The order of Call Bridges in the list may not be in alphabetical order. Be sure to select the correct ID for cms1a.
- Select the Body tab below the URL
- Ensure that x-www-form-urlencoded is selected
- Switch to Key-Value pairs entry (from Bulk Edit)
- Remove any old key / value rows by clicking X at the right side of each row
- Enter callBridgeGroup as a New key.
- Enter the Call Bridge Group ID for East you got from GET /callBridgeGroups as the value
- Click Send
- Now add cms1b. The URL base stays the same as before: https://cms1a.pod2.cms.lab:8443/api/v1/callbridges/. Change the ID in the URL to the ID of CB_cms1b from GET /callBridges. Remember order of Call Bridges in the list may not be in alphabetical order, so don't just pick the second one on the list assuming it is cms1b. Be sure to select the correct ID for cms1b.
- Since you want this to be in the same Call Bridge Group as cms1a, you can use the same Key / Value pair and just hit Send.
- For CB_cms1c, you must change the URL again so that it now has the Call Bridge ID for CB_cms1c. The URL base stays the same as before: https://cms1a.pod2.cms.lab:8443/api/v1/callbridges/. Change the ID in the URL to the ID of CB_cms1c from GET /callBridges. Remember order of Call Bridges in the list may not be in alphabetical order, so don't just pick the third one on the list assuming it is cms1c. Be sure to select the correct ID for cms1c.
- Replace the Value for callBridgeGroup with the Call Bridge Group ID for West obtained from GET /callBridgeGroups.
- Click Send

Now all the Call Bridges have Call Bridge Group IDs assigned, so they can properly reject calls if the system load limit is exceeded and automatically redirect calls to other servers in the group to keep all calls for a particular space on the same server within the group.
Monitoring Load Balancing
All of these parameters are useful, but how can you monitor the system load? This function is also performed via the API.
- In Postman, change the verb to GET
- Set the URL to https://cms1a.pod2.cms.lab:8443/api/v1/system/load
- Click Send
This API call gives you the current load value for the server to which you sent the request. To see the load across the cluster, you must send individual queries to each server in the cluster. The mediaProcessingLoad value gives you the load that is used to calculate whether or not to reject calls based on the load limit. Currently only the media traffic is monitored and measured, which is what consumes the majority of the CPU resources on the CMS server.
Another way to view the load on a CMS server is to use the Web Admin GUI on each Call Bridge. For example, if you navigate to https://cms1a.pod2.cms.lab:8443 and go to the Status > Calls menu, it will show you all the active calls on that server. Similar to the API, this view only shows you calls active on the server to which you are browsing. There is no way to get a cluster-wide view of calls.
Testing Call Bridge Groups
To test Call Bridge Groups, we will simply repeat our earlier test call, where we place calls from Jabber on the laptop, PC1 and PC2 to pod2user4.space using domains cms1a.pod2.cms.lab, cms1b.pod2.cms.lab, and cms1c.pod2.cms.lab. We expect that calls to CMS1a and CMS1b will be aggregated on one CMS (in the East CallBridge Group) with a distribution call to CMS1c (in the West CallBridge Group).
- Make sure you have Remote Desktop sessions up on PC1 (10.0.102.91) and PC2 (10.0.102.91)
- Using Cisco Jabber on your laptop, click to call our Space at pod2user4@cms1a.pod2.cms.lab
- From PC1's Jabber client, call the same Space, but this time send the call to CMS1B by dialing pod2user4@cms1b.pod2.cms.lab
- From PC2's Jabber client, call the same space, but to CMS1C which is in the West group by dialing pod2user4@cms1c.pod2.cms.lab.
-
You should now see two of the calls on either CMS1A or CMS1B, and the third participant on CMS1C with a
single distribution call between the two servers.:
- CMS1A Active Calls (East Call Bridge Group)
- CMS1B Active Calls (East Call Bridge Group)
- CMS1C Active Calls (West Call Bridge Group)
For example: - When finished, disconnect the remote callers first. Hover over each user in the participant list, right-click and select the Expel option.
-
Once all remote callers have been disconnected, hang up yourself by hovering over the video window and
clicking on the button
SECTION COMPLETE!
You've finished this portion of the lab. We have multiple other optional lab sections, depending on your time and interest, to continue on.
-
Understand other CMS features, such as:
- Spaces, to understand more about how Spaces are organized and configured.
- Ad-hoc conferencing and integration with the Unified CM
- Branding, for a more customized deployment.
-
Explore Cisco Single Edge with Cisco Expressway and CMS:
- Learn about deploying the external WebRTC Web App using Cisco Expressway, to provide external users the same Web Bridge capability.
- Configure advanced Business-to-business calling with Skype for Business gateway calling.
- Investigate a Microsoft on-premise integration example, where you will learn about what is needed to configure a dual-home conferencing experience.
- Experience Cisco Meeting Management (CMM), our free product to allow video conference administrators to provide white-glove conferencing services.